Replacing or installing bunding in your warehouse or storage facility but unsure of exactly how to go about it? In the following article, we cover how to install Rubber Floor Bunding.
Rubber Bunding can be installed fairly easily providing you have the time and equipment available, it doesn’t require any specific skills. Alternatively, Trade Enviro can perform the installation for you.
Rubber Floor Bunding is ideal in situations where your storage area requires continual heavy vehicle access. As a result, the install needs to be robust enough to handle heavy loads without compromising its ability to contain spills.
To install rubber bunding you will require the following tools:
- Masonry Drill
- Masonry Drill Bits (10mm)
- 10mm and a 25mm spade bit (for rubber)
- Stainless Steel Dynabolts (10mm) washers to suit
- Masonry Adhesive and or bonding agent
- Air Blower or broom
- 10mm socket
- Chalk or suitable temporary marker
- Tape Measure
- Hand saw and miter box.
Rubber floor bunding is secured by the use of masonry fasteners, however, it also requires a masonry adhesive to ensure it provides watertight containment. We recommend Sika Flex or Fullers adhesive 303 product, however, any suitable masonry adhesive will do the job.
Getting Started (softening the rubber)
Rubber bunding is strong and stands up to heavy treatment but as a result, it can be difficult to straighten and handle. Due to this, we recommend laying the entire length of bunding you will be installing in the sun straight for at least 30-45 minutes. This will soften the bunding sufficiently allowing you to lay it flat and straight.
Pre-Drilling
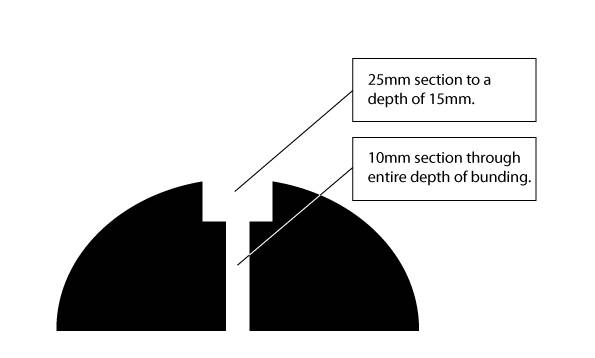
Next pre-drill the rubber in two stages. (400mm apart) We do this to provide a shoulder for the bolt. Your first stage should be with a 25mm spade bit to a depth of 10 – 15mm enough to hide the bolt head. Follow this up with a 10mm drill bit the rest of the way through. If possible we recommend having two drills on hand to save time.
Marking Out the Containment Area
The next stage is relatively simple. First clean the area you wish to install the rubber bunding free of any grease, residue or debris. The surface should be clean of contaminants allowing the adhesive to be applied easily.
Next mark out the area with chalk or a suitable temporary marker. Mark out the entire containment area and assess visually. Once finished laying the rubber bunding out to ensure the area is sufficient for your requirements and to mark out any miters or cuts that are required. All cuts should be done slowly with a hand saw trying not to apply to much heat while cutting (we don’t advise power tools if you want a neat job) cut all corners and dry fit.
Drilling into the Concrete Floor
Next, you will need to fit a 10mm masonry drill bit to drill the holes required in the concrete floor. Use the existing holes in the rubber bunding as a template and drill the holes to a depth of 10mm for the dynabolts. The holes should match the size of the Dynabolts you are using (we recommend 10mm). Do not be tempted to drill the holes slightly smaller or larger as this will make it difficult to insert the Dynabolts in place.
Once all holes are completed, using either a blower or broom remove any residual dust caused by drilling ensuring you have a good surface for allying the adhesive. We recommend blowing out the holes to ensure the bolts fit all the way.
Corner Sections
Where you require a sharp corner simply cut your bunding on the diagonal and drill two holes either side of the join.
Applying the Adhesive
Next, we apply our adhesive, starting from one end and working our way to the opposite side. lay the bunding directly over it finding the pre-drilled holes. Insert the Dynabolts in place first using a hammer and then tightening with a suitable socket until secure. Do not over tighten. Over tightening can cause rubber floor bunding to go out of shape and in some case lift between the bolts. When tightening just smoothly tension the bolt, and site the bund all ways making sure it’s flat and straight
Completion
Once you have completed the entire process we recommend allowing 24 hours before allowing vehicle access.
To maintain your bunding keep the area tidy and free from contamination. It may require re-sealing from time to time.
Here’s the entire process laid out in brief:
- Soften the bunding in the sun to allow easier shaping
- Predrill the rubber bunding, first with a 25mm drill bit to a depth of 10-15mm, followed by the second hole of 10mm width through the depth of the bunding.
- Mark out the entire containment area.
- Make any cuts and corners as required and dry fit.
- Drill into the floor with a 10mm masonry bit, using the existing holes in your bunding as a template.
- Apply adhesive and insert dynabolts as you go. (Don’t over tighten)